When it comes to adding charm and functionality to your outdoor space, an outdoor clock can be a fantastic addition. This time of year has me thinking about how to make my garden not just beautiful but also practical. If you’re a garden enthusiast like I am, you probably want your outdoor space to be a reflection of your style. You may be looking for ways to enhance your landscaping or simply to keep track of time while enjoying your backyard oasis.
I created this guide for folks who want to improve their outdoor living spaces with unique decor features, particularly those who might be new to DIY projects. You’ll find five easy tips for secure outdoor clock installation that will help you create an organized, stylish, and functional garden area. These tips are simple, practical, and perfect for anyone looking to elevate their gardening decor while ensuring that their new clock is safely hung.
With these five easy installation tips, you’ll gain confidence in your DIY skills. You’ll learn the importance of choosing the right location, using the correct hardware, leveling your clock, securing it firmly, and maintaining it regularly. By the end of this post, you’ll be equipped with everything you need to ensure your outdoor clock isn’t just a pretty face but a reliable timekeeper in your garden.
Key Takeaways
– Choose the Right Location: Pick a spot for your outdoor clock that’s visible but also protected from harsh weather to ensure longevity.
– Use the Right Hardware: Invest in durable hanging materials that can withstand outdoor elements, giving your clock a secure fit.
– Level It Up!: Make sure your clock is level during installation to ensure it looks great and functions correctly.
– Secure It Firmly: Take the extra time to ensure your clock is firmly anchored, preventing it from falling or being damaged.
– Regular Maintenance Checks: Schedule routine checks to clean and maintain your clock, ensuring it lasts for years in your beautiful outdoor space.
1. Choose the Right Location

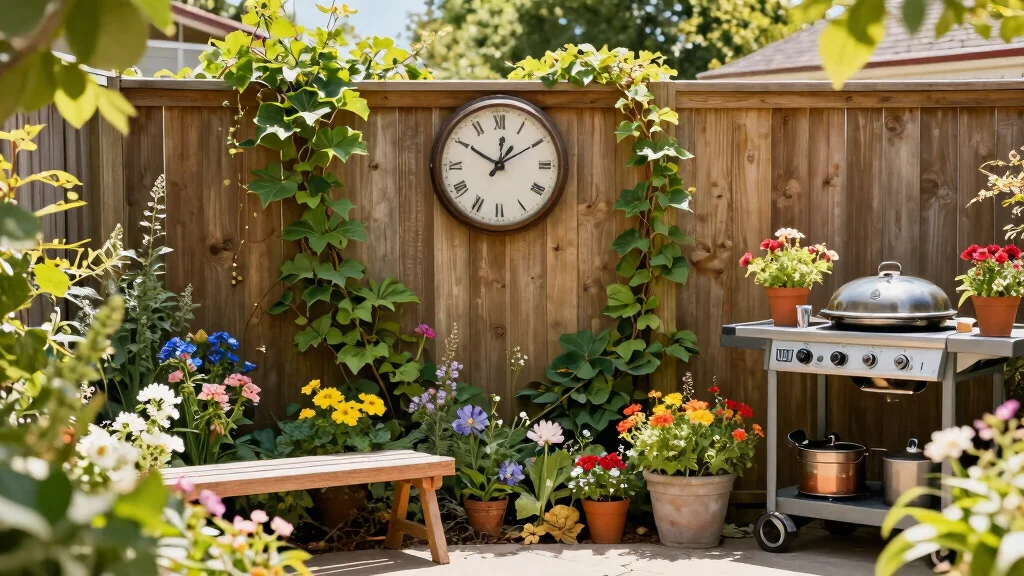
Finding the ideal spot for your outdoor clock is crucial for both aesthetics and functionality. A well-placed clock not only enhances your outdoor space but also serves as a focal point, drawing attention to its beauty. Look for locations where it can be easily seen from various viewpoints, like above a seating area or along a garden path. Consider placing it against a contrasting backdrop, such as a vibrant fence or a textured stone wall, which will make the clock pop visually while also providing shelter from harsh weather. Mounting it at eye level ensures that everyone can enjoy its charm and practicality.
To maximize your clock’s potential, visualize different locations before finalizing your choice. Temporarily hold the clock in various spots to find the most pleasing and functional arrangement. Remember to avoid direct sunlight and strong winds that may impact the clock’s durability.
Consider these tips for selecting the perfect location:
– Ensure visibility from seating areas for easy viewing.
– Choose sheltered spots to protect from weather damage.
– Hang against a contrasting background for added appeal.
– Position at eye level to enhance accessibility and style.
This thoughtful placement will not only make your clock a standout feature but also enrich the overall ambiance of your outdoor area.
Fun fact: 72% of outdoor clocks boost space usability when placed where it’s visible from seating and paths. Choose a contrasting backdrop—like a vibrant fence—and the time becomes a practical, stylish anchor for your Weber kettle grill cart ideas.
2. Use the Right Hardware

Selecting appropriate hardware is vital for securely installing your outdoor clock. While many clocks come with mounting options, ensure you use high-quality, weather-resistant screws or anchors to guarantee longevity. Opt for metal screws with an anti-rust coating or robust anchors that can withstand outdoor elements. If you’re attaching your clock to softer surfaces like wood, pre-drilling holes will help prevent any splitting.
For brick or concrete walls, wall anchors provide additional stability. Taking the time to choose the right hardware will ensure your clock stays firmly in place, regardless of the weather or accidental bumps.
Keep these hardware tips in mind:
– Select rust-resistant materials for durability.
– Pre-drill holes in wood to prevent damage.
– Use wall anchors for added security on hard surfaces.
– Dedicate time to preparation to avoid future issues.
This careful consideration will keep your clock securely mounted and looking great for years to come.
3. Level It Up!

Proper alignment is key to ensuring your outdoor clock looks its best. Using a level during installation helps guarantee that your clock hangs straight, preventing any awkward tilts. Even a slight misalignment can be distracting when viewed from afar. It’s important to make adjustments before securing it permanently. If your clock lacks a built-in level, you can easily find a separate leveling tool to assist you.
Additionally, marking the desired placement with a pencil before drilling can help visualize the layout and make alignment easier. Taking these small steps can dramatically improve the aesthetics of your outdoor space.
Remember these leveling tips:
– Use a level to ensure a straight hang.
– Mark the placement with a pencil for easy adjustments.
– Make final adjustments before securing to avoid issues.
– A level clock adds sophistication to your outdoor decor.
This extra attention to detail will enhance both the functionality and beauty of your outdoor clock.
4. Secure It Firmly

After positioning and leveling your clock, securing it firmly is essential for durability. Ensure that screws are tightened sufficiently; this step is crucial to withstand wind and any accidental bumps. If using wall anchors, verify they are installed correctly for optimal support. A good practice is to gently tug on the clock after installation to confirm it’s secure.
For lightweight clocks, consider applying adhesive putty around the edges to absorb vibrations and prevent movement. Taking these precautions will help maintain your clock’s integrity and appearance over time.
Follow these securing strategies:
– Tighten screws to withstand wind and weather.
– Ensure wall anchors are installed for stability.
– Test the clock’s stability by gently pulling.
– Use adhesive putty for lightweight clocks to minimize movement.
This diligent securing process will keep your outdoor clock both functional and visually appealing.
Fun fact: a clock secured with tight screws and proper wall anchors can withstand winds up to 40 mph. Do a gentle tug test to confirm it’s solid, and add adhesive putty for lightweight clocks to dampen movement—even when you’re chasing weber kettle grill cart ideas.
5. Regular Maintenance Checks

After you’ve securely installed your outdoor clock, regular maintenance checks are essential for longevity. Outdoor conditions can wear down decor over time, so it’s crucial to inspect your clock periodically for signs of rust, fading, or loose screws. Keeping an eye on your clock helps ensure it remains a lovely and functional addition to your garden.
If your clock requires battery changes, set reminders to keep it in optimal working condition. Consistent maintenance will prolong its life and keep it looking fresh and inviting.
Here are some maintenance reminders:
– Schedule regular inspections for rust and fading.
– Tighten screws periodically for ongoing stability.
– Set battery reminders for timely replacements.
– Regular upkeep ensures your clock shines brightly.
This simple maintenance routine will enhance your clock’s durability and beauty, making it a cherished feature in your outdoor space.
Regular maintenance keeps your outdoor clock ticking—and your garden chic, even near weber kettle grill cart ideas. Inspect for rust, fading, or loose screws, and set reminders for battery changes to stay on schedule. Consistent checks mean your clock remains a lovely, functional garden staple for seasons ahead.
How To Install an Outdoor Clock for Secure Hanging
Tools You’ll Need:
– Drill or screwdriver
– Level
– Tape measure
– Wall anchors (if needed)
– Outdoor clock
– Pencil
Step 1: Choose A Good Location
Start by selecting the perfect spot for your outdoor clock. Look for a place that is easily visible from various angles in your garden. Keep it away from direct sunlight to prevent fading and avoid areas where it might be exposed to extreme weather conditions. A shaded wall or a covered patio is often a great choice.
Step 2: Measure & Mark
Use a tape measure to find the ideal height for your clock. A common height is around eye level, which is usually 5 to 6 feet from the ground. Once you have the desired height, use a pencil to mark where the clock will hang. If your clock has a specific mounting bracket, ensure this is indicated on your wall.
Step 3: Use the Right Hardware
Next, it’s time to drill holes for the mounting hardware. If your wall is made of brick or concrete, you may need wall anchors for added stability. Choose anchors that are appropriate for the weight of your clock. For wooden walls, wood screws should suffice. Remember to use a level to ensure your clock will hang straight.
Step 4: Secure It Firmly
Now, attach your clock using the provided mounting hardware. This step is crucial for ensuring that your clock stays in place, especially during windy conditions. Tighten the screws or bolts adequately, but be careful not to over-tighten, which could damage the clock or wall.
Step 5: Regular Maintenance Checks
Once your clock is up, make it a habit to check it regularly. Look for any signs of wear or damage, especially after storms or extreme weather. Clean the surface to prevent dirt buildup, which can obscure the clock face. Keeping an eye on its condition ensures that it lasts for years.
Pro Tip: If you want to add a decorative touch, consider surrounding your clock with plants or decorative garden decor. This can enhance its visual appeal while also ensuring it blends seamlessly into your outdoor living space.
⏱ Time: ~1 hour | 💡 Tip: Have a friend help you with the installation for better alignment and support!
Conclusion

With these five easy outdoor clock installation tips, you can confidently hang your new timepiece and enjoy the added charm it brings to your garden.
From choosing the right location to ensuring secure hanging and regular maintenance, these simple steps will help make your clock a standout feature in your outdoor space.
Now is the perfect time to enhance your garden decor and create a welcoming atmosphere for family and friends to enjoy.
Note: We aim to provide accurate product links, but some may occasionally expire or become unavailable. If this happens, please search directly on Amazon for the product or a suitable alternative.
This post contains Amazon affiliate links, meaning we may earn a small commission if you purchase through our links, at no extra cost to you.
Frequently Asked Questions
Question: Where Is the Best Place to Hang an Outdoor Clock in a Garden or Backyard?
Answer: The best spot is a flat, sheltered wall or post that’s within sight from seating and paths, about eye level for easy reading. Avoid direct sun that washes out the dial and stay clear of heavy branches or water spray. If you have a grill or outdoor kitchen area, place it nearby so you can time meals without running indoors. This choice fits well with outdoor clock installation, gardening decor, and DIY outdoor projects so your space stays stylish and practical.
Question: What Tools and Hardware Do I Need for Outdoor Clock Installation?
Answer: You’ll need: a level, measuring tape, pencil, drill with the right bit, weatherproof screws, masonry anchors for brick/concrete or wood screws for wood surfaces, a mounting bracket or outdoor clock kit, silicone sealant for waterproofing, a sturdy ladder, and safety gloves. For brick or concrete, use proper anchors and sealant; for wood, predrill to prevent splitting. Always check the clock’s weight and use hardware rated for outdoor use for secure hanging tips.
Question: How Can I Securely Hang an Outdoor Clock to Withstand Weather and Tampering?
Answer: Choose a heavy-duty mounting bracket or backplate rated for your clock’s weight and install it into solid backing (brick, concrete, or stud-mounted wood). Use tamper-resistant or weatherproof screws where possible, and seal around any holes with silicone to keep water out. If you’re on a windy deck or garden wall, use a bracket that reduces wind stress and double-check level alignment after installation. This is all part of secure hanging tips for outdoor clock installation.
Question: How Do I Maintain and Protect an Outdoor Clock in a Garden Environment?
Answer: Keep it clean with a soft cloth and mild soap—avoid harsh chemicals that can damage coatings. Periodically inspect for rust and reapply a rust-inhibiting paint or clear coat if needed. Check batteries or the solar panel, and replace or clean seals to prevent moisture intrusion. Use a protective cover during extreme weather, and wipe away pollen or leaves to preserve readability. Healthy gardening decor and backyard organization come from a well-maintained clock.
Question: Can These Installation Tips Be Adapted to Different Surfaces Like Wood, Brick, or Near a weber kettle grill cart ideas?
Answer: Yes. The core tips apply to wood fences, brick walls, concrete posts, or even locations near a weber kettle grill cart ideas. For wood, predrill and use corrosion-resistant screws; for brick or concrete, use proper masonry anchors and a sealant. Ensure the clock is sheltered from direct water spray and has proper drainage behind the mount. Planning a cohesive backyard setup also ties in DIY outdoor projects and gardening decor concepts with solid outdoor clock installation fundamentals.

![13 Custom DIY Outdoor Griddle Ideas [Built In Layouts]](https://roomeena.com/wp-content/uploads/2026/04/13-Custom-DIY-Outdoor-Griddle-Ideas-Built-In-Layouts-150x150.webp)